
| |
|
|
04/16/14 |
|
|
|
Gadget Boy Product Reviews This section contains reviews of motorcycle related products that I tried, or other riders I know have tried and written about. If you have a product you have used, whether you still use it or you tossed it, we would like to hear about it. Waterproof Backpack (October 2012) By George Barker There
have been several occasions for me to be riding in the rain with a bike
full of gear. For us long distance riders it is just a fact we'll
be riding in the rain. We don't even try to avoid it. For
the Iron Butt Rally I hit upon the Overboard Pro Sports
bag. It is 100% waterproof when properly closed. This works
out great for my multiday rallies. The backpack is on the luggage
rack and easy to grab-and-go for the rest bonus. Every minute
counts on rally time and not having to dig in the saddlebags or worry
about my clothing getting wet. You can see it in several photos
on my Iron Butt page.
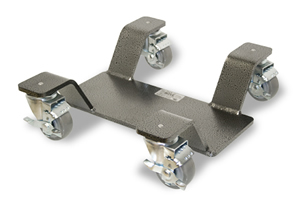
Bike Dolly (November 2011) By George Barker When
it comes to winter storage, I want to move the bike out of the way as
much as possible. In the pages of one of the motorcycle magazines
I found the Park-N-Move product from Legal Speeding
(www.legalspeeding.com). Mine is the Standard model and it allows
me to move the bike forward/back, and side to side just like the videos
they have on the website. Putting the bike on the dolly was great
for ease of moving it around, but since the bike is on the center
stand, it also takes up less floor space compared to sitting on the
side stand.
 One drawback is that it can be a challenge to get the bike up onto
the dolly in the first place, and getting it down in the end. For
starters, the Goldwing is low to the ground. The Park-N-Move has
to slip in "just right" to be positioned for the center stand.
Also, locking the wheels before sliding it under the bike creates
challenges and locking the wheels after slipping it under the bike does
too. Once the bike is up on the center stand, no problem reaching
under with my foot to unlock for moving. One drawback is that it can be a challenge to get the bike up onto
the dolly in the first place, and getting it down in the end. For
starters, the Goldwing is low to the ground. The Park-N-Move has
to slip in "just right" to be positioned for the center stand.
Also, locking the wheels before sliding it under the bike creates
challenges and locking the wheels after slipping it under the bike does
too. Once the bike is up on the center stand, no problem reaching
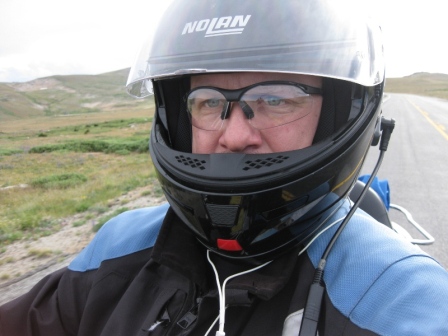
under with my foot to unlock for moving.Taking the bike off the center stand takes care too. Anyone with a Wing knows the bike bounces a little when coming off the center stand. As mentioned above, there is very little clearance to start with. So, rocking the bike off the center stand takes care or it bounced off the dolly's frame above the casters. For this reason, it is not an answer for me if needed on a daily basis. But for winter storage, I definitely recommend it. Bi-focal Safety Glasses (May 2009) By George Barker Years
ago I had Lasic surgery on both eyes. While it corrected my
vision from 20/1000 to 20/20, which I am forever greatful for, it did
cause me to have some issues with night vision. In low light,
everything close up was a little blurry. This meant I could see
down the road fine, but the GPS and the dashboard, not so well. I
tried the big magnifying glass for the GPS and reader glasses, but both
had their issues.
 When
I turned 50, it got worse. I needed the reading glasses all the
time. I work in construction and have worn safety glasses for 30
years. Needing readers and safety I stumbled on the bi-focal
safety glasses for work, which lead to me trying them for riding.
This is one of the best things I have done to enhance the enjoyment of
riding. Not only do I get to read when I need to, the corrective
portion aren't in the way when I don't, and I can ride with the visor
up without worry of bugs or debris hitting me in the eyes. When
I turned 50, it got worse. I needed the reading glasses all the
time. I work in construction and have worn safety glasses for 30
years. Needing readers and safety I stumbled on the bi-focal
safety glasses for work, which lead to me trying them for riding.
This is one of the best things I have done to enhance the enjoyment of
riding. Not only do I get to read when I need to, the corrective
portion aren't in the way when I don't, and I can ride with the visor
up without worry of bugs or debris hitting me in the eyes.There is a little bit of an issue in that every layer of plastic between the eyes and the road adds a little distortion. And, each layer of plastic is a place for oncoming light to bounce back and forth, so ghost images of points of lights happen when the conditions are just right. If you are over 50, or need reading glasses off the bike, get yourself a few pairs of these. Just about any brand will do. They cost from $6 to $16, so you can try out several without breaking the bank. I highly recommend bi-focal safety glasses. SPOT Personal Locator (July 2008) By George Barker My favorite hobby, long distance/endurance motorcycle riding, has me traveling through the night on many occasions during the year. Well, this concerns me about getting stuck, or in an accident, out in the middle of nowhere in the middle of the night. More importantly, friends and relatives have found it interesting, and sometimes inspirational, to follow my progress. Not too long ago, I purchased the SPOT Personal Locator/Tracker (www.findmespot.com) device. SPOT is a GPS unit, but not in the conventional sense. While it knows its longitude and latitude, SPOT does not have a display for you to read off. Instead, SPOT uses this information and communicates with satellites to report on your whereabouts. There are three basic modes; 911, Help, and Check-in. With the premium package, there is a fourth mode; Track Progress. On my trips, I'll put SPOT into Track Progress mode. This is a premium service feature, but well worth the few extra bucks it costs. In this mode, people can log into the website and see my progress any time of the day or night. I tell them, as long as the locator icon is moving, they can rest assured that I'm moving along just fine. I keep SPOT in the right leg pocket of my Roadcrafter suit and have not had any troubles with SPOT communicating with the satellites. At $150 (and I have seen SPOT on sale for $99), plus a $150 annual subscription, the cost is minimal for the features you get. If you travel alone, into the middle of nowhere, I highly recommend this device. However, if your adventures are with a group, or along the path well traveled, you probably will not experience the value. Smart Fuse (March 2008) By George Barker A couple years ago, I came across an amazing fuse. This fuse lights up when it blows. In the top of the fuse there is a little LED that lights up. The older version has an amber light and the newer version has a red LED. Either way, the light is amazing (see my photos).  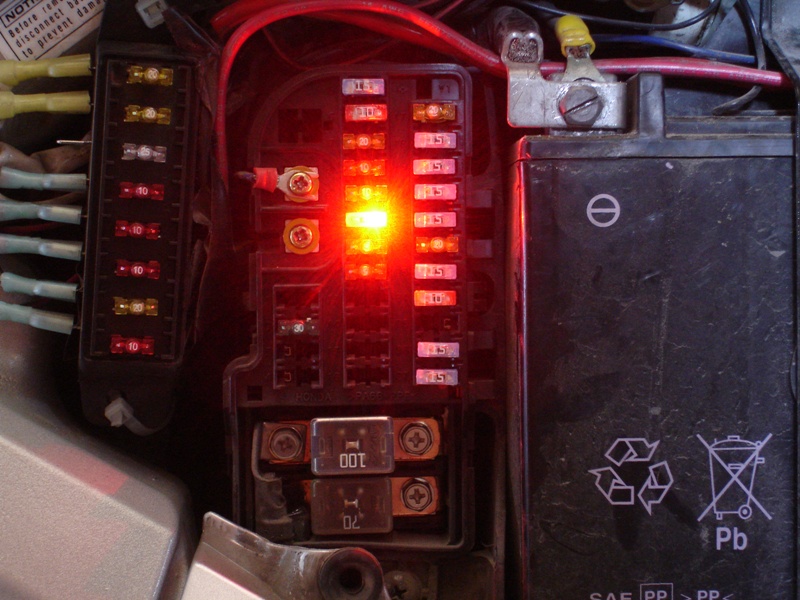 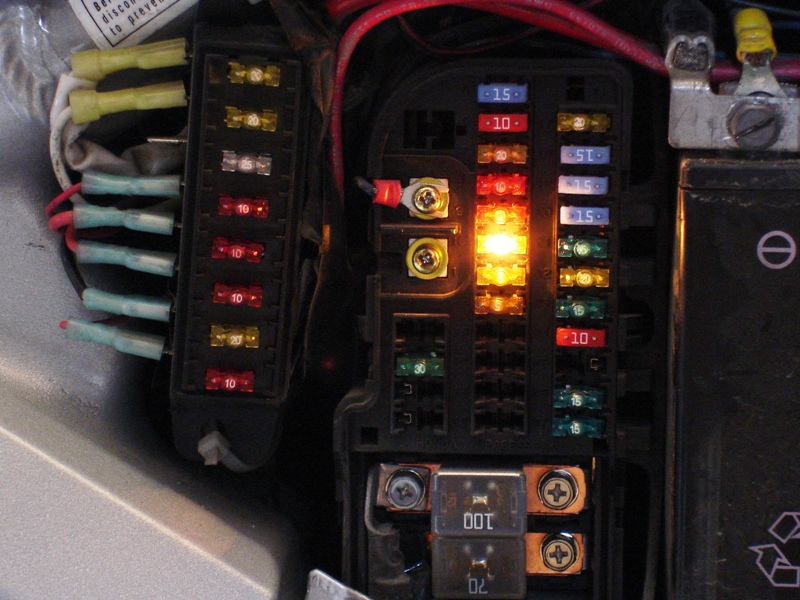 Just in case you can't tell the difference, the left photo is of the normal fuse block. The middle is the red LED and the right photo is the amber LED. The red LED seems a little brighter, but it's just how the photo came out. Actually, both LEDs light up just about the same. The first place I found the fuses was online at Waytek Wire (www.waytekwire.com), and they are about $0.50 each. But, just yesterday I found them in the local auto parts store under the trade name "Smart Fuse", and at about $0.50 each there too. I ride through the middle of the night fairly regularly, so I replaced all the fuses in the main block and in my auxiliary fuse block. I also have a couple in-line fuses up by the handlebars, so I purchased from Waytek an in-line fuse holder that is clear, which it is meant for visibility of the fuse condition. I have not had a blown fuse yet, but for about $15, I know I am going to save myself a lot of time someday. With my luck, it will be in the middle of the night, pouring rain, on the shoulder of an interstate highway. The fuses come in the mini-blade size or the standard ATO size, which is what my old Kawasaki Voyager took. The choice is yours, but this is a gadget I recommend you seriously consider for your motorcycle. Stealth Reflective Tape (August 2007) By George Barker Not too often does a product have so much promise and fail so miserably to meet the least of my expectations. I have a black motorcycle and I was looking to improve the visibility of the bike at night with reflective safety striping on the back. But, I did not want to have "white patches" of material stuck all over the backside (okay I do have have some pride and ego in a good looking bike with clean lines, but we'll talk about that another time). In May 2006 I came across the website www.reflectivelyyours.com that was loaded with stealth reflective tape. This material is black under normal lighting, but reflects white when a light is shown (shined, cast, directed, ??) on it. This is a fantastic idea! Unfortunately, two serious problems cropped up. The first is that the amount of reflected light was fairly low for an intentional reflective material. They have a web page (www.reflectivelyyours.com/generic67.html) that discusses reflectivity and I would put the actual performance somewhere between orange and white clothing. This is not good for a person sitting on a motorcycle and only having 200' of visibility at night. This distance is short of the "initiates action" stage of someone about to hit me. The second problem is that the reflectivity only worked when viewed nearly straight on. If the light source was a little off to the left or right, the reflective tape did not reflect at all. I considered this a serious issue on multilane highways/interstates when vehicles are in the adjacent lane, or when I'm sitting on the shoulder with traffic flowing by in the traffic lanes. My riding buddies and I performed numerous trials of the material on the motorcycle, helmets, and gear and confirmed the sub-par performance under a variety of conditions. While powerful spotlights and high-beam headlights cause improved reflectivity, the low beams of average car/truck headlights reflects very poorly, DO NOT COUNT ON THIS MATERIAL FOR ADDED SAFETY ON A MOTORCYCLE. We (motorcycle riders) have extremely thin margins for error and this stealth reflective tape does not help that margin. Custom Earplug Speakers (Gadget Boy Product Review - January 2007) By George Barker My search for the ultimate hearing protection may be over. At a motorcycle rally, this past summer, I met up with Marilyn Navia on the subject. Who? Marilyn is a certified audiologist and just the person I was looking for. As many of you know, I have been searching for years for a way to protect my hearing from damage while riding the motorcycle, and yet listen to music and the CB. Between the wind, engine, and radio noise, my hearing was starting to suffer. After of a day of riding, which for me is 12-16 hours and up to 1,000 miles, my ears would ring through the night. I have tried the rollup foam type, the rubber ribs, and even the Etymotics ER6. They all suffer from one thing or another that caused discomfort with long distance riding. Marilyn owns “Now Hear This” (www.plugup.com) and creates dozens of different products to protect our hearing. She creates ear plugs for all seasons, and in my case, for motorcyclists. At the rally, she created a set of custom molded earplug speakers with a 1/8” plug that fits my electronic gadgets. 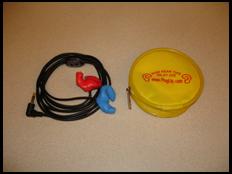 On the first day, she molded the earplugs
by sticking a doughy substance in each ear for a few minutes as it set
up. Then, overnight she installed the speakers and cabling,
trimmed the excess dough, and I picked them up the next day. The
earplugs can be made in any color from tan/flesh to fluorescents.
Since I use a helmet when riding, I chose red (right) and blue (left),
with no concern for fashion. The plugs fit entirely within my ear
canal and so there is no pressure from helmet foam pushing them into my
head. They are inserted and removed just like a hearing aid,
which is very easy. Marilyn will not make claims on the noise
reduction, but my limited testing indicates there is at least a 30 dB
reduction in sound. In case you did not realize, each 10 dB
reduction is cutting the sound in half. So, I figure about 88% of
the noise is cut out. This has allowed me to turn the music
volume down so low it’s almost shut off. Ironically, it
seems to have also allowed me to hear some of the environmental noises
better, like trains or sirens. On the first day, she molded the earplugs
by sticking a doughy substance in each ear for a few minutes as it set
up. Then, overnight she installed the speakers and cabling,
trimmed the excess dough, and I picked them up the next day. The
earplugs can be made in any color from tan/flesh to fluorescents.
Since I use a helmet when riding, I chose red (right) and blue (left),
with no concern for fashion. The plugs fit entirely within my ear
canal and so there is no pressure from helmet foam pushing them into my
head. They are inserted and removed just like a hearing aid,
which is very easy. Marilyn will not make claims on the noise
reduction, but my limited testing indicates there is at least a 30 dB
reduction in sound. In case you did not realize, each 10 dB
reduction is cutting the sound in half. So, I figure about 88% of
the noise is cut out. This has allowed me to turn the music
volume down so low it’s almost shut off. Ironically, it
seems to have also allowed me to hear some of the environmental noises
better, like trains or sirens.There are other custom molded earplug speaker makers out there. But, I recommend an audiologist to do the actual fitting. You can find these people anywhere hearing aids are fitted. They are the experts and the warning “Don’t try this at home” is sage advice. The earplug speakers are a bit pricey at nearly $200. But, they have been so wonderful I strongly recommend them for anyone who is on the bike for even a few hours. Now, at the end of the 1,000 mile day, the only ringing in my ears are the church bells off in the distance. UPDATE (7/21/07): After nearly 12 months and 13,000 miles, the right side earplug developed a little issue. The problem was twofold. First, the speaker lost its grip with the molding and started to slide in a out. When it slid in, the holding tube extended out of the plug on the eardrum side of the plug. This kept the plug from going all the way into the ear when the earplug was inserted, and that was a little uncomfortable. Second, the speaker cable chaffed and a wire exposed. Eventually, one of the internal wires broke and I lost sound in that ear. The good news was that Marilyn fixed them free of charge and no questions asked. All I had to do was to send along a photo of the earplug inserted in my ear. They are like new again and I am convinced, more than ever, these are the earplugs to buy, and Now Hear This is the place to purchase them. UPDATE (9/1/08): Well, after two and half years and more than 30,000 miles, the right side ear speaker wire broke off for good. The extra thick speaker wire is great to keep down tangles, but my feeling is that it was too stiff to flex under the stresses and strains under the helmet. In my opinion, these ear speakers are still the best method currently on the market for hearing protection, while allowing one to listen to music, the intercom, or other audio device. UPDATE: (2/5/09): At the Chicago Motorcycle Show, I purchased my second pair of ear speakers from Now Hear This. The price is up to $250. I noticed that the cord is slightly thinner and much more flexible. I am hoping to get 40,000 out of this pair and still recommending this as the way to go for hearing protection. UPDATE: (10/5/09): The ear speakers that I purchased at the Chicago Motorcycle Show did not survive a year. With about 14,000 miles and around 300 hours, the right speaker started to lose a connection inside the ear plug. I sent them in to Marilyn and she put a different cord in over the winter. But I'm not really holding out too much hope they will last more than a riding season. So, I decided to purchase another set of ER6i's from Etymotics as a backup. Sorry Marilyn, I love the sound reduction and the perfect fit, but next time I may have to try someone else. Induction Flashlight (Gadget Boy Product Review - December 2006) By George Barker “I can’t wait until the bike breaks down in the middle of nowhere at night!” Well, maybe that’s actually crazy. How about, “I can’t wait to go camping on the bike this summer!” You see, I received an Induction Flashlight for Christmas. Mine is the Readylight, hand crank version, from Brookstone. But, a quick search of the internet indicates there are a wide variety of flashlights out there. You can find ones you shake, squeeze or other unthinkable things to power the gadget. 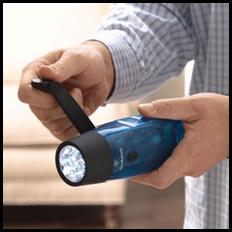 An
Induction Flashlight is one that does not have conventional batteries,
which have to be replaced from time to time. An Induction
Flashlight works by the user moving a magnet within a coil of wire,
which generates electricity to charge a rechargeable battery. The
crank on the Readylight flashlight moves gears and other parts
connected to the magnet. Crank for a minute or two and
you’ll have light for an hour. An
Induction Flashlight is one that does not have conventional batteries,
which have to be replaced from time to time. An Induction
Flashlight works by the user moving a magnet within a coil of wire,
which generates electricity to charge a rechargeable battery. The
crank on the Readylight flashlight moves gears and other parts
connected to the magnet. Crank for a minute or two and
you’ll have light for an hour.What appeals to me is that I won’t have to worry about dead batteries at the worst possible time (in the middle of nowhere at night). Just crank it up, and let there be light. The other thing that appeals to me is that the bulbs are the white LED variety. These have ultra long life expectancies and are super bright. I am hoping they also stand up to the shake rattle and roll in the saddlebags. I suppose on the down side, there are moving, plastic parts that might not stand up so well to the vibrations of motorcycle riding. This time next year I should have about 13,000 miles of road testing on the light. So, I’ll keep you posted. One final thought, the flashlight is advertised as being able to charge a cell phone through a charger port on the side. This could be a life saver in its own right. The Nokia is the standard phone it charges, but there are adapters for other cells. Unfortunately, there doesn’t seem to be an adapter for my Motorola cell phone. The flashlight is extremely easy to crank, and is reasonably priced at $35. I would recommend the Brookstone Readylight for the trunk or saddlebag, or as an emergency flashlight at home, anytime. Blind Spot Mirrors (Gadget Boy Reviews - July 2006) By George Barker I was never one (generally) to have to look cool on the bike. One exception was that I thought blind spot mirrors were goofy looking and detracted from what clean lines were left. Well, I'm here to let you know I've changed my mind. Blind spot mirrors are the little round or square mirrors you stick onto your conventional rear view mirrors. They have a convex curvature and so give you a wider view than flat mirrors (Remember "Vehicles are closer than they appear"?). I purchased small, rectangular mirrors and stuck them in the lower, inside corners of the bike's rear view mirrors. The way I have my mirrors set up, these areas point back at my arms and hands, so are useless in viewing the rear anyway. Those of us in the Long Distance community can find ourselves checking blind spots over a hundred times in a given day. What's more, on about one in ten, I turn my head and yank on my ear speakers. (I love my ear speakers) Very frustrating and sometimes painful. After about 700 skeptical, daylight miles, I started to become comfortable with looking in the blind spot mirrors instead of turning my head way back. Traffic in the adjacent lanes even starts to show in my peripheral vision before it leaves the blind spot mirror. So, I can turn my head dramatically less than before. I found this reduced fatigue. There was a learning curve in looking in the proper mirror for what I wanted to view, and at intersections I still have to look 90 degrees left and right. But, at least I have cut down on the pain and fatigue associated with checking my blind spots. I got a pair of the blind spot mirrors at AutoZone for under $5. I like them a lot at this point and recommend you consider them if you put on a lot of highway miles or want a wider view of your surroundings. Of course, you may have to give up a little of your cool look. Ear Speakers (Gadget Boy Reviews - October/November 2005) By George Barker As many of you know, I have been searching for a way to reduce the wind noise making it into my ears. My riding style often has me 10 to 12 hours in the saddle at a time, and my ears end up ringing from the wind and engine sounds. Well, I finally found a way to spare my ears, have a comfortable fit, and be able to listen to my favorite music. The solution was found in a very low profile ear bud, or ear speaker. The product is Etymotics ER6 Ear speakers, and they can be found on the internet for as little as $76. I zeroed in on these ear speakers because of their claim of 34-36 dB noise reduction. This product definitely reduced the noise this much. These also allowed me to turn down the volume on the radio/tape to the level that one, or none, of the bars showed on the radio display. Reducing the radio also added to the noise reduction! To complement the ear speaker, I purchased the "EdAptor" from Edsets. This simple little adapter allowed me to plug into the standard 5-pin connector on the bike and it provided both a microphone link up to the helmet headset using the existing lower cord, and a jack for the ear-bud plug. This allowed me to use the ear-buds for music, intercom, CB, etc, instead of the helmet speakers while riding. When using the EdAptor adapter, the speakers in the helmet headset are disconnected to maintain the proper impedance load on the audio system. The EdApter was $45. When not using the CB or intercom, I plug the ear speakers directly into my MP3 player. When used together, the ER6 and EdApter are a killer combination for wiping out road noise. It did take a little “other” sensory perception to get the feel for bike and general street awareness. With only that slight drawback, I recommend these to anyone who appreciates the sound of silence and for those who wish to spare their ears. UPDATE (April 2006): These ear speakers have been giving me just a little trouble along the way. Apparently, my right ear canal is just a little larger than my left. After the plugs have been worn for awhile, the right one loses it perfect fit and external sound starts to slip past the earplug. This is especially true in the middle of a long trip where I have been wearing the plug for several hours. I have to shove the earplug into the ear farther and more often. This makes for some discomfort (but not painful). So, the search continues. Cool Vest for Hot Riding Days (August 2005) By George Barker For the trip to the National AVA rally in Durango, I decided to purchase the New Classic Cool Vest from Silver Eagle Outfitter. I knew it was going to be hot weather, but I had no idea just how it would actually get to be. The vest material is composed of a three layer system; an inner that is water repellent and thermally conductive, a core layer that is composed of hydrophilic (water loving) fibers, and an outer layer that is a breathable shell. This cool vest works on the evaporative process. That is, the garment gets soaked with water and as your body heats up the vest, the heat evaporates the water. Of course, as the water evaporates and leaves, it absorbs heat and cools off your body. This is the same process that evaporating sweat goes through to cool your body naturally. What I found is that the vest works its best magic in the range of about 85F to 95F. While the vest has a cooling effect below 85F, I really did not need it and I felt I was sitting in a humid zone of air. Above 95F, and especially above 100F (I tested it to 105F), everything is so hot that the 10 or 15 degrees of cooling still left me feeling overheated. When I made an effort to pay attention to the cooling action, I could tell there was a cooling action there. But, when it is 100+ out, it is time to pull over, get a room, and jump into the pool. One thing I did notice is that if I stood up on the pegs to get into the air stream more, the cooling feeling was significant. So, I came to conclude that us Voyagers, sitting behind a fairing, would not be able to use the cool vest to its full potential. I have wind deflectors too (Drag Specialties), but routing full air to the rider still did not take full advantage of the vest. For this testing, I had a silk weight tee shirt, the vest and then a denim jacket over the vest. At one point, I thought maybe the denim did not allow the vest to “breathe” so I rode for awhile without the jacket. What I found was that without the jacket, the vest still did not get much airflow. Not enough to be significant. Further, I discovered that my arms stayed cooler with the denim jacket on. Apparently, the shade from the jacket beats out the extra air flow because the suns rays directly heated up my arms. The New Classic Cooling Vest was $95 and I recommend it for anyone who wants to (or has to) stick to the road to that 100F mark. Plus, I definitely recommend it for anyone who rides without a fairing. If you only ride in the spring or fall, or you get off the road when the temperature gets into the 90’s, the vest will not get much use and you may wish to pass on it. UPDATE (March 2009): I thought I would add this update from my Butt Lite ride last summer. When I crossed Texas it was up to 105F and I wanted to keep on going. When saturated, the cool vest dropped the temperature under my Roadcrafter by about 10 to 15F. Unfortunately, it only lasted for about 45 minutes before the water was gone and the temperature inside my suit started to rise again. What I did was to take some of my drinking water, and while riding, pour it down the back of my neck and the front of my shirt. My drinking water initially was hot (from being in the backpack), but it very quickly cooled down as evaporation took over. It worked like a charm. I ended up dumping water on myself about once an hour. But that is all it took to get through the hottest 4-5 hours of the afternoon. The cool vest is definitely going in the saddlebag if there is any chance for 90F+ temperatures. Tech Tip for Lighting (May/June 2005) By George Barker Sometimes I am a little slow on the uptake. I have an old/new tip regarding light bulbs and the Voyager, or just for motorcycles in general. About four years ago I had one of my running lights burn out while on a short day trip to Door County. Like many of you, I carry spare bulbs for just such an occasion. Well, I replaced the burned out bulb and stood back to see how it looked. I could not believe it. The new one was much brighter than the old one. I did not think there could be such a difference! Anyway, I replaced the other bulb too and from then on replaced the running lights every year or two, just to maintain bright bulbs. Fast forward to early April this year. In preparing for my spring break bike trip, one of the checklist items was to make sure I do not have any burned out bulbs. None were burned out, but I thought I would install some of those LED tail lights in an attempt to cut power consumption. (See Gadget Boy review elsewhere in this newsletter) They did not work, but since I had the back end opened up, I thought I would toss in one of those 1157 bulbs I had been carrying around for five years. Wow, what a difference! The brightness had to be double the other bulb. Since the previous owner of my Voyager was a little old lady who only drove it to church (wink), the bulbs had to be originals, from 1992. With a little research, I discovered that all bulbs naturally dim over time. Halogens dim a little faster than incandescent bulbs. As I understand it, a light bulb filament does not actually “burn”. Because the bulb has a vacuum (there is no air inside) or if it is filled with an inert gas like argon, combustion is not possible. What actually happens is the filament molecules sublimate (move from solid to gas state without becoming liquid) and at an accelerated rate when the filament is energized. The molecules vibrate loose from the filament and float off. Some recollect back on the filament, and some collect on the inner surface of the glass. Bulbs filled with an inert gas will stay brighter longer because the gas raises the chance that the sublimated filament molecules will hit a gas molecule and bounce back to the filament. As more and more of the filament molecules fly off, the filament thins and dims. Also, as more and more of the molecules stick to the inside of the glass, less light makes it out of the bulb, and so the dimmer the bulb gets. Anyway, I checked the Voyager Owner’s Manual and could not find a recommended replacement interval. I also checked the shop manuals and could not find a maintenance or replacement frequency. So, if your bike is a few years old, it may be worth your time to check to see if a new bulb improves the light output. I did and it made a dramatic improvement in the visibility of the tail lights. LED Taillight Bulbs (May/June 2005) By George Barker With the advent of heated clothing, powerful running lights, light bars, and all sorts of electrical gadgets, the alternator has to carry a heavier load than ever. In an attempt to trim the electrical load, I invested in the relatively new LED taillight bulbs. I was hoping for a white version, but they are only available in red at this time. I purchased mine from Rider Wearhouse (Cat# 2542), but I have seen them in a number of other catalogs. This bulb is a direct replacement for the 1157s in the brake lights. What I found was that the lights are very bright when viewed straight at the top of the bulb. The problem is that the Voyager brake light sits at 90° from axis of the motorcycle. In other words, it does not point directly to the rear of the bike. But rather, it lights up the tail light cavity and people behind see the reflections bouncing around in the cavity. The LED brake light did not work very well at all in illuminating this cavity. At $22 per bulb, they are a bit pricey too. I do not recommend purchasing these bulbs for the Voyager brake lights. Clip On Compass and Thermometer (March/April 2005) By George Barker A few years ago I bought a clip-on Compass and a clip-on Thermometer from the Riders Warehouse (www.aerostich.com). Both of these gadgets clip onto the Voyager handlebars with no problems. There is a third clip-on, a quartz crystal clock, but I did not purchase that one because we have a readily visible clock on the radio. I have found them very handy to have, especially the compass, as on occasion I like to know which way I’m going. The downside of these gadgets is that the liquid leaked out of the thermometer during the first winter. The range was to –20F to +130F, but I never did figure out what happened. Anyway, it no longer was accurate. At $10 each, I felt this was still an item worth carrying. Metzler ME880 Tires (October 2003) by George Barker
Geez, I like this part of the newsletter. There are so many things that make the ride more enjoyable. My style quickly takes me out of the sunny, warm, dry mode and throws me into the elements. But, having been riding for only three years, there is a product I "basically" took for granted. My tires.
I have always used Dunlop 491's front and back just like the guy I bought the bike from. I felt safe, secure and did not want to chance another product. About 5,000 miles ago, I had to replace both the front and back tires. But, Winnebagoland was out of my favorite tire. Shoot! John there said they had these Metzler 880 tires that riders seem to like. He said they were "the only tire someone actually came back to the store to say how well they worked." Reluctantly, I agreed. Well, there must be someone watching out for me because this turned out to be one of the better decisions I made. The BIG DEAL was that the "Voyager Wobble" disappeared. This is the wobble I experienced at low speed or decreasing moderate speed. I was thinking of buying the Superbrace to help cut down on the wobble, but that decision is now on hold. [ed. note, it is a distant memory] So far, the tires have handled superbly in all weather.
I have been running with 36 psi in the front and 38 psi in the rear (single rider). At the last meeting, however, the conversation turned to tire pressures and how I may be on the low side. Well, a check with Metzler’s website indicates singe rider pressures should be about 40 for the front and 48 psi for the rear.
Stealth Edging (September 2003) by George Barker
I am still in search of a noise reduction system for riding. In the last issue, I reviewed the Sony Noise Canceling Headphones. For the last few months I have been trying out a product called Stealth Edging, by Saeng/TA Corp.
This is a nifty rubber "trim" that mounts on the outside edge of a motorcycles windshield. Since the price is $13 per foot, I decided to try a two foot strip across the top of my Voyager screen. The Stealth Edging performed wonderfully at reducing the wind noise on the highway. I tried it on and off and there was a definite difference. In two-up, there was a definite reduction in wind noise for the pillion rider (back seat) too. In the city, where I do not get a lot of wind noise anyway, the edging did not add to noise reduction.
As all of you know, in the rain, water works its way up the outside of the wind shield and down the inside. Well, another advertised benefit of the Stealth Edging performed well. That is, the rain water was channeled off to the side where it either blew across my shoulders or dripped out of the way on the glove box and cassette holder covers. It was nice not to have the rain blowing onto my helmet or down the front of my jacket.
And now for the bad news. My style of riding has me looking just over the top of the windshield, an inch or so. That is not such a bad thing for the edging until the end of a long day of riding. I am about two inches lower in the saddle at the end of a 500 mile day, and that edging was squarely in my view. Since it is black, and does not come in clear version, this is a problem. I estimate it cuts out about 30 to 40 feet of roadway viewing and at a distance of about two seconds out, not good. Another drawback, in the same vein, occurs when tooling through the rolling back roads. The strip of limited vision crossed my view over and over again as I alternately looked over and then through the shield as I rolled over the hills and through the valleys.
In closing, since I am an Iron Butt-type, I know I will use the Stealth Edging on long distance rides or rides in the rain. The edging can be put on or taken off very easily. So, that two foot strip has found a definite spot in my bag of touring tricks.
Noise Canceling Headphones (July 2003) by George Barker
Friends and relatives say I like gadgets for my Voyager, so I thought I would include, from time to time, this product review column. If you have a gadget, or any other item, please submit a short review. It may help another member find a safer, more comfortable ride. Or, in this case, avoid spending a few bucks on a product that does not work very well.
Sony Noise Canceling Headphones (MDR-NC11). I bought these headphones with the hope that modern technology would cancel out some, or all, of the wind noise. I wear a full face helmet and in the city, these headphones canceled out the noise very well. They also canceled out some of the cycle noises that I did not realize I depend on. I found myself riding at 4000 rpm until I learned to "feel" the engine through the handlebars, foot pegs and seat. On the highway it was a different story. Traveling with the wind, at highway speeds, was not a noisy proposition for me and the headphones made for a fairly quite ride. Against the wind it was so noisy that the headphones could not keep up. In other words, they did not work hardly at all! A nice feature would be the ability to turn up the canceling ability, but these headphones do not have that feature. Also, with the full helmet, I could only wear the headphones for a little over an hour before they hurt my ears. Although these did not work as well as I hoped for the Voyager, I have since found them very useful for listening to music or audio books in the car. These headphones work well with steady noise, so I think they would also do well to cancel out the noise on airplane rides. One final note, these headphones are a little pricey at about $130.
|